2D Shapes and Shapely#
Shapely is a well-known and well-maintained library for working with 2D geometry. Internally it is using the C/C++ library GEOS, commonly used for geographic information systems (GIS) software. Shapely’s computational geometry features are extensive. Integrating Shapely into py5 is valuable to creative coders.
Setup#
Install shapely with pip or with conda using the conda-forge channel.
pip install shapely
conda install shapely --channel conda-forge
Refer to the Shapely Installation page for more information.
Pro tip: DO NOT install Shapely from the default conda channel. You may end up with the current version of shapely and an old version of the GEOS library. You will then frustrate yourself with bugs.
Development of py5’s integration code was done with Shapely version 2.0. The previous version, 1.8, should work just as well though.
Geometry Types#
All of Shapely’s Geometry types are supported. A table of each Shapely geometry type and what py5 will convert it into is below:
Shapely Geometry Type |
Converted to py5 Type |
|---|---|
a single POINT shape |
|
open POLYGON shape with no fill |
|
closed POLYGON shape with no fill |
|
closed POLYGON shape with fill |
|
POINTS shape |
|
GROUP shape, containing open unfilled POLYGON shapes |
|
GROUP shape, containing closed filled POLYGON shapes |
|
GROUP shape, containing any of the above |
Shapely geometry types are pure geometry objects with no style information,
such as color or line weight. In all cases, each geometry will adopt the py5
drawing style in effect when convert_shape() is called.
By default, py5 will convert LineString and LinearRing objects into POLYGONs with no fill. However, there is an optional argument you can use to convert them into filled POLYGON shapes.
Let’s dive into some examples, starting with our necessary imports.
from shapely import affinity
from shapely.geometry import (
    GeometryCollection,
    LinearRing,
    LineString,
    MultiLineString,
    MultiPoint,
    MultiPolygon,
    Point,
    Polygon,
)

import py5_tools
import py5
Basic Polygon Example#
We can create a Shapely Polygon like this:
polygon1 = Polygon([[0, 0],
[200, 0],
[200, 100],
[100, 100],
[100, 200],
[0, 200]])
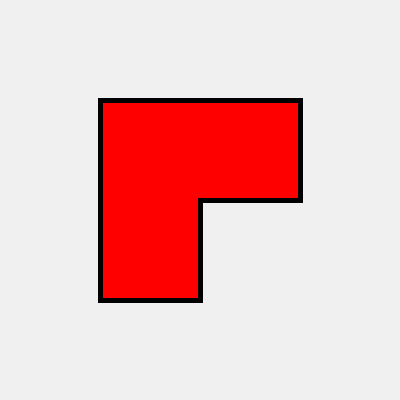
polygon1

We can then use this Shapely Polygon in our Sketch.
def setup():
    py5.size(400, 400)
    py5.background(240)

    py5.fill('red')
    py5.stroke_weight(5)
    py5.stroke('black')

    s1 = py5.convert_shape(polygon1)
    py5.shape(s1, 100, 100)


py5.run_sketch()
Here’s what that looks like. Notice the shape is drawn with red fill and a black stroke, just as we intended.
py5_tools.screenshot()
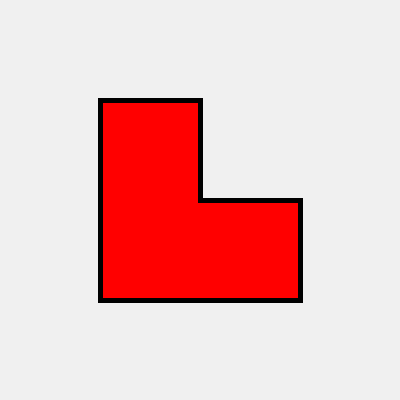
It’s also upside down compared to what we saw when we created it:
polygon1
Why is that?
To understand this, consider py5’s coordinate system. The origin is in the upper left corner of the Sketch window. The positive x axis points to the right side of the Sketch and the positive y axis points to the bottom of the Sketch.
When Shapely renders shapes as an SVG image, which is what it is doing to display our Polygon in this notebook, it draws the SVG with the origin in the lower left corner. The positive x axis still points to the right, but the positive y axis points up.
If this bothers you, you can flip the shape with the optional
keyword argument flip_y_axis. Use it like this:
def setup():
    py5.size(400, 400)
    py5.background(240)

    py5.fill('red')
    py5.stroke_weight(5)
    py5.stroke('black')

    s1 = py5.convert_shape(polygon1, flip_y_axis=True)
    py5.shape(s1, 100, 100)


py5.run_sketch()
Now the Polygon is drawn the same as it is displayed in the notebook.
py5_tools.screenshot()
The flip_y_axis argument makes them look the same, but be warned: if
you are working with multiple shapes, all with different sizes, using
this feature may create confusing problems for you to debug. It is
better to use Shapely shapes with py5’s coordinate system in mind and
ignore how Shapely orientates shapes when it displays them in this notebook.
Internally, the flip_y_axis keyword argument is using the following
Shapely code to flip the object relative to the object’s center. This code
or any of Shapely’s other
Affine Transformations
might be useful to you to make adjustments to Shapely’s geometries.
affinity.scale(polygon1, yfact=-1, origin="center")

Basic LineString Example#
For our next example, let’s look at LineString objects.
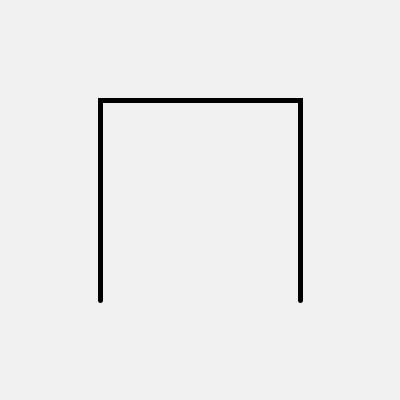
line1 = LineString([[0, 200],
                    [0, 0],
                    [200, 0],
                    [200, 200]])

line1

We can use this in a Sketch similar to our previous example.
def setup():
    py5.size(400, 400)
    py5.background(240)

    py5.fill('red')
    py5.stroke_weight(5)
    py5.stroke('black')

    s1 = py5.convert_shape(line1)
    py5.shape(s1, 100, 100)


py5.run_sketch()
As expected, the call to fill() had no effect.
py5_tools.screenshot()
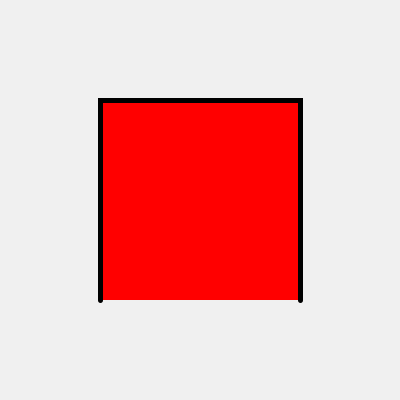
py5 supports creating open shapes that look like that that also have a fill.
If we want our LineString to have a fill, we can use
the optional lines_allow_fill keyword parameter.
def setup():
    py5.size(400, 400)
    py5.background(240)

    py5.fill('red')
    py5.stroke_weight(5)
    py5.stroke('black')

    s1 = py5.convert_shape(line1, lines_allow_fill=True)
    py5.shape(s1, 100, 100)


py5.run_sketch()
Now the object has a fill. This is how you can create an open, filled Polygon using Shapely.
py5_tools.screenshot()
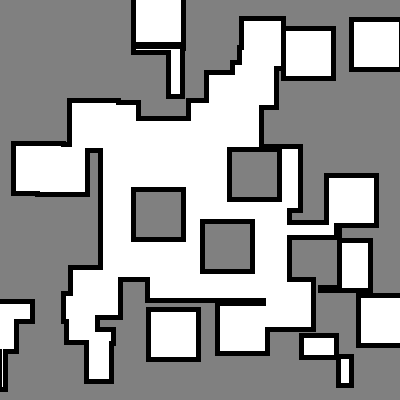
Boolean Operations#
One of the most exciting things about Shapely is the ability to construct elaborate geometries by performing boolean operations on Shapely objects. Let’s explore that with an example.
shape = Polygon([[100, 100],
                 [100, 300],
                 [300, 300],
                 [300, 100]])

p = Polygon([[-25, -25],
             [-25, 25],
             [25, 25],
             [25, -25]])


def setup():
    py5.size(400, 400)
    py5.frame_rate(5)

    py5.fill(255)
    py5.stroke(0)
    py5.stroke_weight(5)


def draw():
    global shape
    random_location = py5.random(py5.width), py5.random(py5.height)
    add_p = affinity.translate(p, *random_location)
    shape = shape.union(add_p)

    random_location = py5.random(py5.width), py5.random(py5.height)
    sub_p = affinity.translate(p, *random_location)
    shape = shape.difference(sub_p)

    py5.background(128)
    py5.shape(py5.convert_shape(shape))


py5.run_sketch()
In this example, we start with the Polygon shape and add and subtract
from it in each call to draw(). Shapely manages the boolean operations
so that py5 is able to draw the stroke around the outside border.
py5_tools.screenshot()
There is a lot more that you can achieve with Shapely and py5. Read the Shapely Documentation for inspiration and ideas for how to use the two libraries together.